It slices! It dices! It…sliced off a bit of my finger.

A couple of nights ago, I was making a galette of rutabaga and sweet potato. To get the vegs sliced thin enough to develop the desired crusty surface, I pulled out my mandoline…which has a slider and grabber contraption that keeps one’s fingers away from the blade. Not wanting to waste anything, I decided to shave down an especially lumpy rutabaga without the mandoline’s slicer housing thingy until it would fit. In other words, I freestyled on the sharpest implement in my kitchen.

Surely you can guess what happened next:
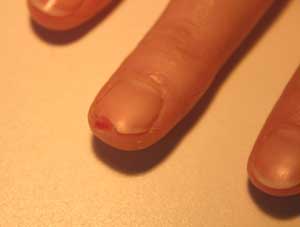
fingerslice

It hurt and bled like the dickens. Luckily, the Husband found the finger bit (and the nail!). Safely ensconsed in a tourniquet-tight bandage and rubber glove, I rinsed off the rutabaga slices and proceeded with dinner preparations. Happy to report that the galette was delicious.

Root Vegetable Galette

3# root vegetables, peeled and very thinly sliced

(potatoes, rutabagas, sweet potatoes,parsnips–alone or combined–all work well)

1/4# melted butter (you may need a little more)

2 T. fresh thyme, chopped

salt & pepper to taste

– Preheat the oven to 400F, placing a well-seasoned cast iron skillet in the oven to heat up. Pour half of the melted butter into the skillet. Layer in the sliced vegetables in concentric circles, overlapping slightly, to make a single layer. Drizzle with butter and sprinkle with thyme, salt, pepper. Make another layer, again drizzle and sprinkle.

– Lightly butter a sheet of foil and lay on top of the vegetables. Using a heavy pan (another skillet works well), press down on the foil. Bake the galette –with the additional pan on top–for around 30 minutes or until the edges look browned and the vegs have softened. Remove from the oven and allow to sit around 10 minutes.

– When ready to serve, remove additional pan and the foil. Lay a plate or serving platter that’s slightly larger than the cast iron skillet over the top. Holding the platter to the skillet, flip over to turn out the galette onto the platter. Wear your oven mitts! If any crunchy slices have go astray, just patch in. Garnish with thyme sprigs and cut into wedges to serve.

Speaking of cocktails…

A friend visiting from out of town was in need of grown-up pursuits, far from nursery or playground. I took her to The Violet Hour, truly the most civilized bar in Chicago. The chill/luxe atmosphere of flickering candles, high-backed chairs, and low-lit chandeliers fosters quiet conversation. Which is the perfect vibe for savoring the outrageously delicious cocktails. People, this place is serious: they make their own bitters. And they won’t let you in unless there’s a chair for you. Go early, there’s usually a line after 7.

Crackers…biscuits…what to eat with a cocktail

Years ago I read in one of Marcella Hazan’s cookbooks the value of having something easily on hand to serve to pop-in guests. This is a recipe I discovered on Epicurious, following is my modified version. Not so much a cracker as a savory biscuit, these are delicious: cheesy, spicy-tangy, crunchy, buttery. The dough is formed into logs and then chilled. Freeze a couple of logs and you’ll have a quick, fabulous treat to bake up in 15 minutes and make unexpected guests feel welcome. Also great as a light nibble with drinks before a heavy holiday dinner.

For all of you copy editors out there, Cheddar is capitalized because the cheese is named for the English village where it was first made in the 12th century.

Mustard Cheddar Crackers

1/2# unsalted butter, very soft

1# sharp grated Cheddar

2 scallions

1 egg yolk, at room temperature

1 T. Dijon mustard

2 T. dry mustard (I like Coleman’s)

1/4 c. mustard seeds, toasted and cooled

1 t. kosher salt, plus more for sprinkling

2 c. all-purpose flour

Blend butter, cheese, yolk, scallions, and Dijon in food processor until smooth. Add remaining ingredients and pulse until the dough has just come together (don’t overdo it or your dough will be tough). Scrape the dough into a bowl and chill for around 15 minutes, until firm enough to handle.
Form the dough into 2 logs, about 1 inch in diameter. I find that using plastic wrap to help shape the logs is the least messy way. Refrigerate at least 4 hours or you can freeze the logs and use as needed.

When ready to bake, remove logs from freezer. Preheat oven to 350F. Line 2 baking sheets with parchment or Silpats. Slice logs into thin slices. Sprinkle with a little kosher salt before baking. Crackers are finished when pale golden, 15 minutes at most. Store in an airtight container only when completely cooled.

Holiday goodies

Holiday bakers, start your ovens. Your friends are counting on at least a little bag of homemade love, of course they’re really hoping for a giant tin stuffed with your famous shortbread. In my world, nothing feels better than making something the people I love…will love.

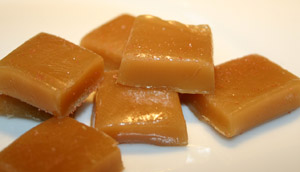
But what to make for the gluten-intolerant? The celiac-afflicted certainly get a raw deal all year round, but  it must be really tough at Christmas Cookie Time. My solution of late is candy. Specifically, salted caramels that taste like a grown-up childhood memory. Buttery, toasty, sweet, and a bit salty. Try one with a belt of your best Scotch and see if you don’t feel sorry for your 7-year-old self, making do with those Brach’s caramels from the A&P.

Candy-making scares people, but really it’s just a matter of precise temperature monitoring and showing proper respect to sugar’s ability to impart the worst burns of your life. Here’s a silly but informative site about sugar and candy. One piece of specialized equipment is crucial, however: you must have a candy thermometer to make candy. Spend the 10 bucks, store it in a place where the bulb won’t get crushed, and make these delicious caramels for your loved ones.

Salted Caramels

4 T. butter

1 1/2 c. heavy cream

2 c. sugar

1 t. sea salt

1/2 c. corn syrup

1 1/2 t. vanilla extract

+ more sea salt for sprinkling

Generously butter a 9-inch glass baking dish. In a deep, heavy saucepan, combine all ingredients except for the vanilla. Clip your candy thermometer to the side of the pan. Cook over medium heat and stir slowly with a wooden spoon. Cook to 245F to 248F (the firm-ball stage). No lower, no higher! Remove pan from heat and stir in vanilla. Pour into prepared pan and cool to room temperature. This is where your silicone oven-mitt comes in handy, too, as any stray caramel drips will wash off easily. When cooled, remove the whole slab from the pan (you may need to cut out a tiny corner piece to achieve this: cook’s bonus) and sprinkle with sea salt. Put the slab on waxed paper and refrigerate until firm enough to cut, about 15 minutes. Using a large, heavy chef’s knife, cut the caramels into 1-inch squares. If the slab is too hard to cut, let it sit out to soften. If it’s too soft, chill it a little longer. Wrap into pieces of waxed paper and store the wrapped candy in a ziplock bag in the fridge. Distribute to the truly worthy.